Thursday, 21 October 2010

Conclusion

Overall I have rather enjoyed this project. 3D modelling last year was not one of my favourite modules mainly because I think I was inexperienced and struggled to learn a lot of the working methods. I found that the things I did learn from last year and the tutorials this year, allowed me to have a better understanding of what was going on with the models and how to manipulate different parts of the model.

I am very proud of the final model that I have created because it is a model of a head that I completed from scratch. This is quite an achievement when I have only been using the software for just over a year and from seeing some people’s work online, this can sometimes take a lot longer for people to learn the skill set needed to create the head.

The thing that I did best throughout the task was using all of the skills that I knew plus those that were taught by the tutorials to create the best model that I could. I would like to attempt the model again at some point to see whether the skills that I picked up after doing the model would change and hopefully improve my future modelling. Throughout the task there were a few issues that came up such as a part of the model not looking correct or a struggle in creating a part of the model but I was able to remain calm and proceed through the project.

Although I was happy with the final result, there were a few things throughout the project that I did not like and would be the main things that I would change if I had the opportunity to re-model the head.

The first thing I disliked was probably the main thing. The fact that I followed the tutorials and used my own images and tried to pick out the key parts still did not make the model look like me. One reason for the lack of likeliness is that in my pictures and in real life, I have my hair spiked up. Unfortunately because of the methods of modelling that we used, it would have taken a huge amount of time, which I did not have, to model and colour the hair. This meant that I was left with a flat hairline, which when compared to my face made it look unrealistic.

The other thing that I was quite disappointed with was the Ears on the model. Due to the intricate detail of some of the polys and vertices in the creation of the model, it made it very difficult to unwrap and texture it without having Overlapping or inverted faces. If I re-did the project or had longer to work on it, I would definitely work on this part of the model a lot more.

I was very happy with my ability to keep up to date with this project. It took me a little while to get into the project but once I started I was able to flow through it pretty well. I was able to keep a blog going throughout the year and place it all onto this blog towards the end so it can be used for people to see the different processes that I went through to complete the model. I have noticed that a lot of classmates have suffered to keep their work up to date and are now facing a tough run into the final hand in.

Throughout this project I gained experience in new skills to use in the software of 3ds max in the future. These include:

Spline Modelling

Uv Unwrapping

Cylindrical Mapping

Pelt Mapping

Planer Mapping

Using Photoshop images to paint a texture onto the model

The different tools in Photoshop – Clone Tool, Patch Tool, Lasoo Tool

I was also able to gain a lot more knowledge and practise using tools in 3ds max such as:

Extruding objects

Chamfering Edges

Using Weld and Target Weld functions

Using Shift + Move to create extra Polygons

General manipulation of vertices, edges and Polygons

Seeing as this is only my second year using 3ds Max, overall I am happy with the work that I produced and the skills that I have learnt. In my first year using the software I gained some experience using the basic methods however this project push those methods to the next level and I got to learn a lot more. There are a few issues still with the head model, which unfortunately I am unable to change at this point; e.g the ear and the small crack in the forehead but overall the finished project is very well created in my opinion.

Thankyou for reading this blog and I hope it has been insightful into how to create the head model. Any feedback you have will be greatly appreciated :)

Final Model


Week 5 - Creating the Eyes

The final step of the model creation was to re-create the eyes. Previously in the project I had created some very simple eyes with 3 material colours, white, brown and black to create some very basic eyes. This was mainly because a) I wanted to see what the model looked like with eyes and b) because the model looked freaky just having gaps for eyes.

To be honest though, due to me just creating very simple eyes that didn’t take much time, it actually had the opposite reaction and made my model look even freakier. This was okay though because all the way through I knew that I would spend some time creating some more realistic eyes at the end of the project.

I used the “Lasoo” tool in Photoshop to cut out my eye from the original images that I took of my head from the front and the back. I then saved this eye as a separate image in Photoshop. In 3ds Max 2010 I ten took the spheres that I had previously used for my practise eyes and moved them so I could see them and work on them. I then opened the material editor and created a new material using the image of the eye. I then added the material to the Sphere. I had a bit of an issue with the material because it was repeating itself so that it fit onto the Sphere.

To counter this problem I used my knowledge of materials that I had learnt from earlier in the project and edited the tiling. I increased both the tiling on the X and Y until they looked better on the actual model. I rotated the sphere so that the eye pupil and brown around the eye faced the front.

I then positioned the eye into the eye socket and moved it so it did not cover some of the outer skin. I then created a second sphere and gave it a basic white material. I scaled the Sphere so that the shape changed that I could place it behind the eyeball and still see the white colour that is in a human’s eye. The white sphere shape now sits halfway through the eyeball so it looks like its all on one layer. I cloned this image to put it in the opposite eye.


Week 5 - Creating the Glasses

Throughout the project I had a little idea that I wanted to do to possibly improve my mark for the head model. For the original images, I removed my glasses that I wear on a day to day basis so that it made it a lot easier for the modelling process that I have gone through. I decided that to maybe get a few more marks whilst also making the model look more realistic, I wanted to model and create some glasses for my model.

I didn’t intend to spend a huge amount of time working on the glasses as I know the amount of marks available for a small extra is not worth spending huge amounts of time on. The process that I used was a simple method using the skill set that I have learnt over the last few years.

I started off by creating a plane with 4 length and 4 width segments. I placed this plane over the eye of the model to get an idea of shape, size and positioning

I moved the vertices around on the front of the glasses so it gave a more realistic look of the lens and a small frame around to hold the lens in place.


The next step was to create the frame that would go over the ear and keep them on a person’s face. To do this I used the “Shift + Move” tool to create a few extra polygons. I then angled them to run alongside the head. When I got to the top of the ear, I created two more Polygons, which I moved the vertices of to hook them over the ear.

I then started to create the bridge over the nose. I used the same method to create some extra polygons over the nose. I shaped them so they bridged onto the top of the nose.


I added a turbosmooth and a symmetry modifier to make the glasses more realistic. I finished off by adding 2 materials to the glasses. I selected all of the Polygon’s that were in the frame and set their material ID. I then selected all of the lens Polygons and gave them a new ID. This would make it easier for me to apply 2 separate materials. I created a dark blue colour for the frame and a very light blue colour for the lens. I reduced the opacity of the lens so that it was transparent but had a slight tint of colour to show that there was a lens on them.


Wednesday, 20 October 2010

Week 4 - Texturing

I now had a complete face and head model however it was only 1 colour and that was a default colour for the modelling. The next step was to add some detail to the look of the model by applying a texture to the model. This texture would contain basically a copy of the original images that I took however it would be modelled to the size, angles, direction and positions on my model.

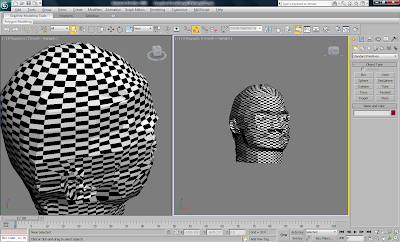
To start off I used the tutorial to show me the method of checking the topology flow by adding a chequered material to the model. When using this method, you are looking for all of the checkers to be pretty square like, the more like a square the better however there would occasionally be some differences.


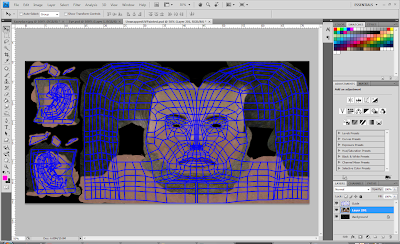
I followed the tutorials and applied a UV Unwrap modifier to the model. This allowed me to have a flattened out version of my head. I spent some time making this image more user friendly so that there would be fewer problems later in time when it came to actually putting the detail onto the map. This meant moving around some vertices to have them placed better whilst also moving some around to give my Polygons a more generic square shape. I also had to weld the seam of vertices down the centre of the face after applying the symmetry Modifier.

This is where I have had one of my biggest problems. Unfortunately due to the way I modelled the ear, it would take me an extremely long time to move all of the vertices out so that none are inverted or overlapping on the ear. I tried to follow the tutorial and use the “Pelt Mapping” tool for the ear however the effect that it had on the ear was not what I desired.

I decided that the time that I had could be better spent working on other parts of the project so decided it would be best using one generic skin colour for the whole ear. This meant that I could reduce the focus on moving parts of the ear because I would be covering it in one colour.

The Face

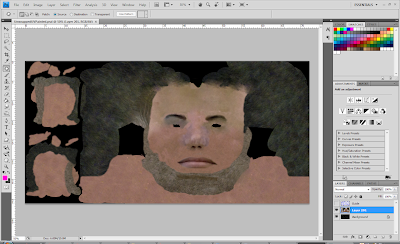
I started working on the face by placing the mouth and nose onto the head model. The mouth was pretty simple as I used the “Lasoo” tool to cut out the mouth from my original face images. I then placed this onto the head UV Unwrap image and resized it till it fit correctly on the unwrap texture. I tested to make sure it looked correct on the head model before moving on.

I then moved onto the nose. I started off by using the “lasoo” tool on the bridge of the nose. This then gave me the basis of the nose to start working from. I then cut out the side of the nostrils and placed them onto the texture. I moved these about until they were in the correct place for the nose. I wanted to keep them looking very similar to the original image because it would give the edges that a human nose has. I then moved onto the nostrils, which were quite simple once I had got them started. I cut out one of the nostrils from the image and resized it to fit onto the texture. I repeated this process for the other nostril and checked it on the head model. After realising that I had placed them too low on the unwrap image, I went back into the Photoshop image and moved them up. This then gave the affect of the nostrils going up into the nose, like a human nose has.

The next part of the face that I worked on was the forehead. This was because the forehead is a similar colour throughout so I would be able to use one cut from the original image and copied it a number of times and just changed the tone using the “Patch and Clone Stamp” tools. I moved onto the rest of the face, which wasn’t too difficult because it was quite easy to work on the unwrapped image. I used the tools that I had learnt so far in the project to continue using the same methods to complete the face.

To complete the eyebrows I used the “Lasoo” tool in Photoshop to cut out the eyebrows. I then copied them onto the main head image and used the “transform” tool to re-size and rotate the image to the correct position.

I also spent a lot of time on the beard/stubble on the face. To accomplish the look of the beard, I used the “Lasoo” tool in Photoshop to cut out a small portion of the stubble, which I then repeated a number of times and shaped to look like the original images.

The Hair

The hair was pretty simple to work on. From the map image in Photoshop, it was simple to work out where the hair would be for me to work on. I started off by using the “Lasoo” tool to grab a part of the hair from the Photoshop image and placed it onto the texture. I then copied smaller parts of the image to make the shape of the hair. I also used the “Clone Stamp” tool to create a better shape for the hair. I would save the document and then load the model and see how the texture looked on the head.

The only problem that I found with the texturing of the hair is that in my image and in life, I have my hair spiked up. Unfortunately due to the method of building the model that I was using, it was not going to be possible to have the hair spiked up. The problem with this is that it would create a lot less realism when comparing the model to the images that I originally took

The Ear

One of the toughest parts of the UV Unwrap was painting over the ear. I knew that because of the time restraints and the way I had modelled my ears, there would be a lack of detail going into the ears. This was a bit annoying because I’d have loved to have made them look a lot better but I was going to press on with what I had.

Using the unwrap image, I was able to mark out what parts of the ear would join up to the rest of the head. This meant that I could use different tools to mould the texture necessary for each part. For the main part of the ear and the lobe of it, I used a general skin colour that started off as the colour of the skin on the face. Using the “Patch” tool, I changed the tone and blend in places to create a lighter colour. I then continued on the beard/stubble from the main part of the head along with matching up the hair.

Back Of The Head

I decided to work on the back of the neck. I currently had hair flowing all over the top and back of the head but this isn’t the correct flow of my hair. It is squared off at the bottom of the back of my head so I wanted to create this effect on my model as well. To do this I used the “Lasoo, Patch and Clone Stamp” Tool’s to shape off the back of the hair. This was quite tough because I was editing a flat map and causing the affect on the rounded head model. It made it hard to measure out and get the exact spots to work on. I would use the “Paint” tool to create a point that I would then be able to work from. I then took a step backward to get rid of the line that was painted and would slightly edit the amount of skin and hair. I would save the file and test it in 3ds Max 2010 and then edit it accordingly.


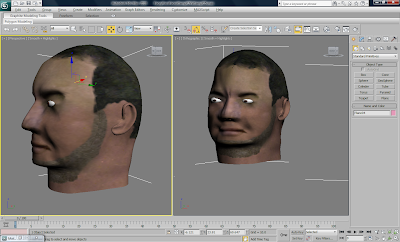
I now had my UV Unwrap image completely filled in using Photoshop. I was now able to apply this as a material to my head and the UV Unwrap modifiers would correctly place the material in relation to the size and shape of the head.

Week 3 - Creating The Nostrils and Mouth

I had now pretty much completed most of the face and worked on extra parts of the head such as the back of the head, neck and ear. I now wanted to do some more work on individual parts of the face and give them more detail to make them a lot more realistic. These two parts were the mouth and the nostrils.

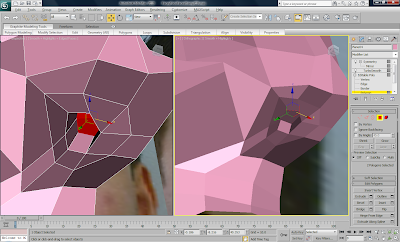
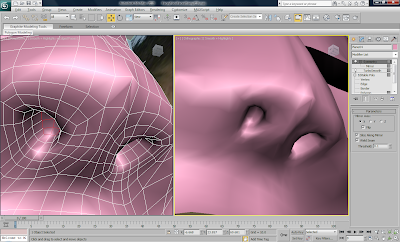
I started with the Nostrils. These would not really be seen much by anyone looking at the head model because the rest of the nose over shadows them a lot. This being said, I still wanted to put some detail into the creation of them so that the model would look more realistic.


The method the tutorial gave for creating the nostrils was pretty simple but yet very effective. It relied upon taken the Polygon’s that build up the underside of the nose and editing them t create a Polygon or 2 in the centre of the nose that would be used for the nostril. I used the “Cut” tool, which I had now used a lot, to create this desired set of Polygons. I then used the “Extrude” tool to push them back into the nose and head. I moved the end around a bit to get the best looking shape and affect so that it looked very realistic.


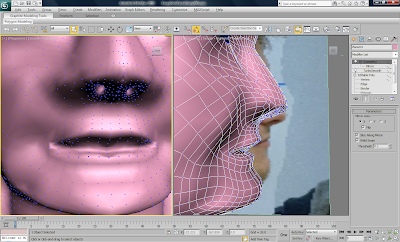
After creating the Nostril’s, which I was very happy with, I decided the next step would be to work on the mouth. I did this mainly from eyesight and worked on it until I thought it looked best. Unfortunately after creating the mouth, I sat back and something looked distinctively wrong with the face yet me nor classmates were able to put our fingers on what it was. Suddenly someone pointed out that I had modelled the mouth obviously from my mind and got carried away and modelled it with an open mouth whereas in the original images I had my mouth closed.

To create the mouth I used the Shift and move tool to create Polygons coming off of where I had modelled around the mouth and left the gap for it to be modelled. I did some editing of the vertices and polygons to create the correct mouth shape and the turbosmooth modifier made it look more realistic.


This was not too much of an issue because it just meant some editing work with the vertices to pull them out and get rid of the effect of the mouth being open.


I was very happy with how the mouth eventually turned out. it looked good with the mouth open but in comparison to the main images, I felt it was necessary to re-create it with the mouth closed. I was very happy with how the final product came out.

Week 3 - Building the Ear

The next major part of the head to work on was the Ear. Again I used the video tutorials to work through this process. I started off by using the original images of my face and side of the head to focus on the ear on the side image. I then used the same method to create the lines of topology for the ear that I had used earlier on the face.


Ear Topology

Once I had outlined the lines of Topology on the ear, I created the Polygons in the shape of the ear. I used the front image of my head to pull out the vertices in the same way that I did for the face. The front image captured the edges of my ear so I was able to know how far they should be brought out by. I would then use the tools explained in the video tutorials to create the different indents of the ear and lobe. Tools such as the “Chamfer” tool allowed me to soften some of the edges and create different Polygons that I could push in and pull out to create the correct ear shape.


I then used the Weld and Target Weld Tool to connect the ear to the head.

The front part of the ear did not look correct because it should be welded to the head rather than sticking out.

I decided to change this and spent some time working on getting rid of the polygons that pushed the ear out and started welding them to the rest of the head.

As you can see by the image, the ear connection to the head shows some pinching of the vertices where it connects. This is a bit of an issue but it would mean a lot of effort cutting through vertices and maybe re-doing some of the topology so I am going to leave it for the moment but it would definitely be a possible improvement if I was to redo the project.