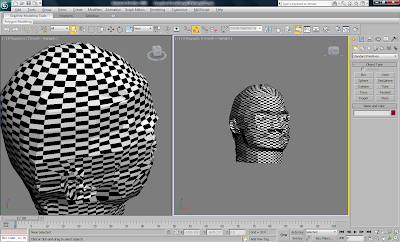
To start off I used the tutorial to show me the method of checking the topology flow by adding a chequered material to the model. When using this method, you are looking for all of the checkers to be pretty square like, the more like a square the better however there would occasionally be some differences.

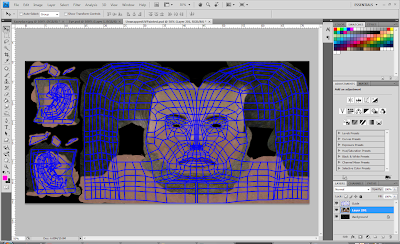
I followed the tutorials and applied a UV Unwrap modifier to the model. This allowed me to have a flattened out version of my head. I spent some time making this image more user friendly so that there would be fewer problems later in time when it came to actually putting the detail onto the map. This meant moving around some vertices to have them placed better whilst also moving some around to give my Polygons a more generic square shape. I also had to weld the seam of vertices down the centre of the face after applying the symmetry Modifier.
This is where I have had one of my biggest problems. Unfortunately due to the way I modelled the ear, it would take me an extremely long time to move all of the vertices out so that none are inverted or overlapping on the ear. I tried to follow the tutorial and use the “Pelt Mapping” tool for the ear however the effect that it had on the ear was not what I desired.
I decided that the time that I had could be better spent working on other parts of the project so decided it would be best using one generic skin colour for the whole ear. This meant that I could reduce the focus on moving parts of the ear because I would be covering it in one colour.
The Face
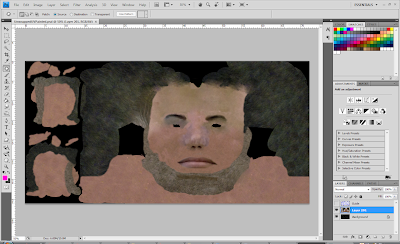
I started working on the face by placing the mouth and nose onto the head model. The mouth was pretty simple as I used the “Lasoo” tool to cut out the mouth from my original face images. I then placed this onto the head UV Unwrap image and resized it till it fit correctly on the unwrap texture. I tested to make sure it looked correct on the head model before moving on.
The next part of the face that I worked on was the forehead. This was because the forehead is a similar colour throughout so I would be able to use one cut from the original image and copied it a number of times and just changed the tone using the “Patch and Clone Stamp” tools. I moved onto the rest of the face, which wasn’t too difficult because it was quite easy to work on the unwrapped image. I used the tools that I had learnt so far in the project to continue using the same methods to complete the face.
To complete the eyebrows I used the “Lasoo” tool in Photoshop to cut out the eyebrows. I then copied them onto the main head image and used the “transform” tool to re-size and rotate the image to the correct position.
I also spent a lot of time on the beard/stubble on the face. To accomplish the look of the beard, I used the “Lasoo” tool in Photoshop to cut out a small portion of the stubble, which I then repeated a number of times and shaped to look like the original images.
The Hair
The hair was pretty simple to work on. From the map image in Photoshop, it was simple to work out where the hair would be for me to work on. I started off by using the “Lasoo” tool to grab a part of the hair from the Photoshop image and placed it onto the texture. I then copied smaller parts of the image to make the shape of the hair. I also used the “Clone Stamp” tool to create a better shape for the hair. I would save the document and then load the model and see how the texture looked on the head.
The only problem that I found with the texturing of the hair is that in my image and in life, I have my hair spiked up. Unfortunately due to the method of building the model that I was using, it was not going to be possible to have the hair spiked up. The problem with this is that it would create a lot less realism when comparing the model to the images that I originally took
The Ear
One of the toughest parts of the UV Unwrap was painting over the ear. I knew that because of the time restraints and the way I had modelled my ears, there would be a lack of detail going into the ears. This was a bit annoying because I’d have loved to have made them look a lot better but I was going to press on with what I had.
Using the unwrap image, I was able to mark out what parts of the ear would join up to the rest of the head. This meant that I could use different tools to mould the texture necessary for each part. For the main part of the ear and the lobe of it, I used a general skin colour that started off as the colour of the skin on the face. Using the “Patch” tool, I changed the tone and blend in places to create a lighter colour. I then continued on the beard/stubble from the main part of the head along with matching up the hair.
Back Of The Head
I decided to work on the back of the neck. I currently had hair flowing all over the top and back of the head but this isn’t the correct flow of my hair. It is squared off at the bottom of the back of my head so I wanted to create this effect on my model as well. To do this I used the “Lasoo, Patch and Clone Stamp” Tool’s to shape off the back of the hair. This was quite tough because I was editing a flat map and causing the affect on the rounded head model. It made it hard to measure out and get the exact spots to work on. I would use the “Paint” tool to create a point that I would then be able to work from. I then took a step backward to get rid of the line that was painted and would slightly edit the amount of skin and hair. I would save the file and test it in 3ds Max 2010 and then edit it accordingly.


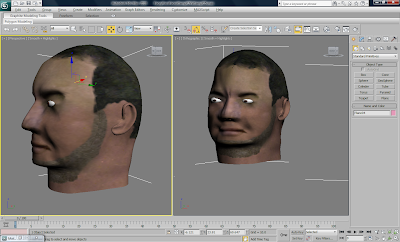
I now had my UV Unwrap image completely filled in using Photoshop. I was now able to apply this as a material to my head and the UV Unwrap modifiers would correctly place the material in relation to the size and shape of the head.
No comments:
Post a Comment